Fixed media accompaniments are the most common by far, with roughly three quarters of the electro-acoustic euphonium repertoire making use of some kind of pre-recorded audio track. Thankfully, these pieces are also the easiest to set up for, requiring at minimum only a playback device, a speaker, and something to connect the two. While there are a number of ways to play audio through a speaker in performance, most are variations on two basic setups: running your audio through a mixer, or running it straight out to the speaker.
Using a mixer has several advantages; it makes staging two speaker stereo setups and monitor speakers much easier, and you can adjust all your audio levels from one control panel. It also allows you to set up for several different kinds of electronic pieces at once, reducing the amount of time required to reset equipment between pieces in performance. You could, for instance, have a piece using guitar pedals running through a mono channel, a piece for fixed media on one of your stereo channels, and a piece for laptop on another stereo channel, with each channel’s audio levels preset and ready to be unmuted in turn.
Running your sound directly from your playback device into one or a series of speakers, on the other hand, is much cheaper and easier to set up. Given that the bulk of the electronic euphonium repertoire is for fixed media, a performer looking to get into electro-acoustic performance would probably do well to start with one or a pair of good PA speakers and the appropriate cables to connect them, and then expand into mixers and other equipment later on as needed.
Playback Device to One or Multiple Speakers, Stereo Input
Many loudspeakers have an auxiliary input; in this case, all you need to do is run a 1/8” aux cable from your playback device’s headphone jack into the speaker’s aux input. If you’re only using a single speaker, your setup is done. All you need to do is set the gain knob on the input channel and the main volume knob at a combined level that is appropriate for your audience while also minimizing speaker hiss.
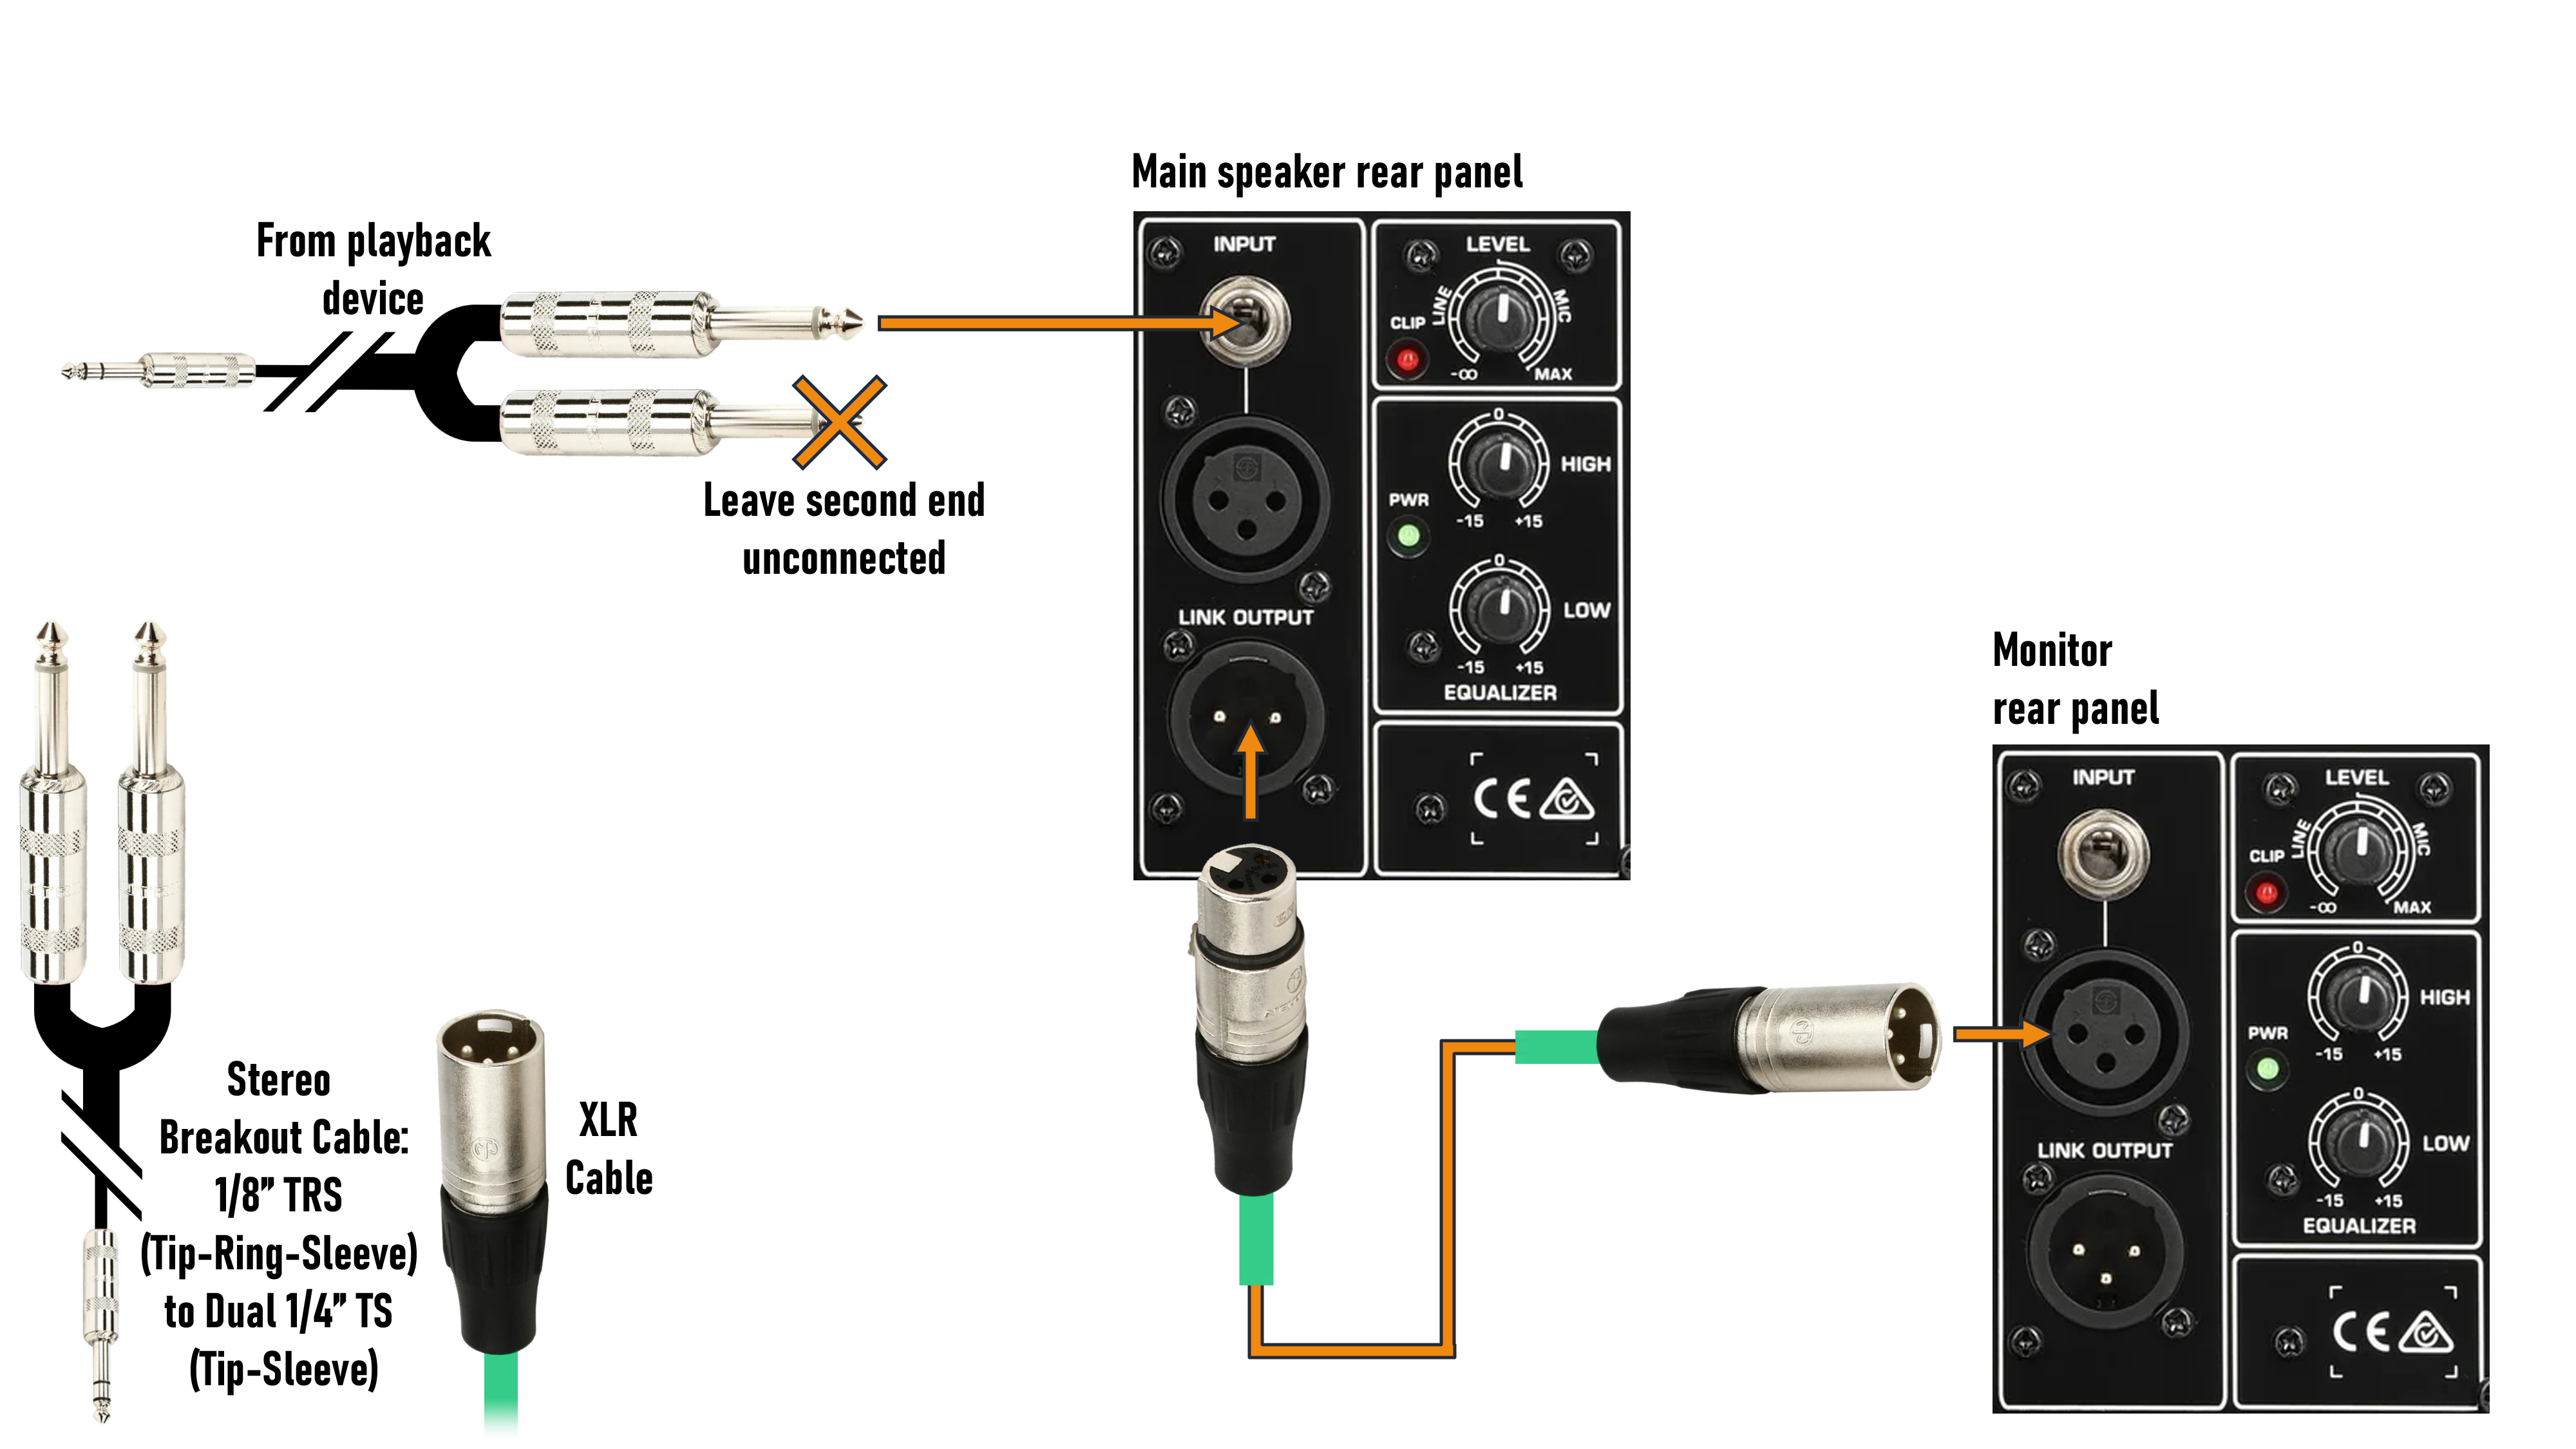
If your speaker doesn’t have an aux input but does have two separate 1/4” inputs, you can use a stereo breakout cable to go into both channels simultaneously. Note that the breakout cable isn’t the same as a splitter: instead of duplicating the output, the breakout cable divides the stereo cable into two separate 1/4” jacks, one for the left channel, and one for the right. Running these both into the same speaker will sum them into a mono output. For this reason, you’ll want to make sure the gain on both channels is set to the same level, otherwise one of the original stereo channels, left or right, will be less present in the speaker’s sound. If your speaker has a “ducking” option, you’ll want to turn that off. If both your channels have a mic/line switch, set them both to the same thing; if only one channel has a switch, set it to mic.
If you want to use a monitor speaker, you can easily add one by running an XLR cable from your main speaker’s passthrough output to the input of your monitor. In this fashion, you can daisy-chain as many speakers as you like, provided all the speakers except the last one have passthrough or “link” outputs. Be aware, though, that regardless of how many speakers you have, this is still a mono setup – the same sound will be coming out of every one of your speakers, so you will lose any left-right panning effects present on your fixed media track.
Back to Top
Playback Device to One or Multiple Speakers, Mono Input
If your speaker doesn’t have an aux input and only has a single input channel, then you will still need to use a breakout cable. You will connect only one of the ends, however; the other will be left dangling free. In this case, you will first probably want to use an audio editor like Audacity to mix your original stereo fixed media track down to mono, otherwise you’ll be performing with only half of your accompaniment.
While it may seem like you can simply put a 1/4” adaptor on an aux cable, this will actually end up muting large portions of your track through a process called phase cancellation. For a more in-depth discussion of this, see section 5.
Back to Top
Stage Setup: Playback Device, Single Speaker, and Optional Monitor
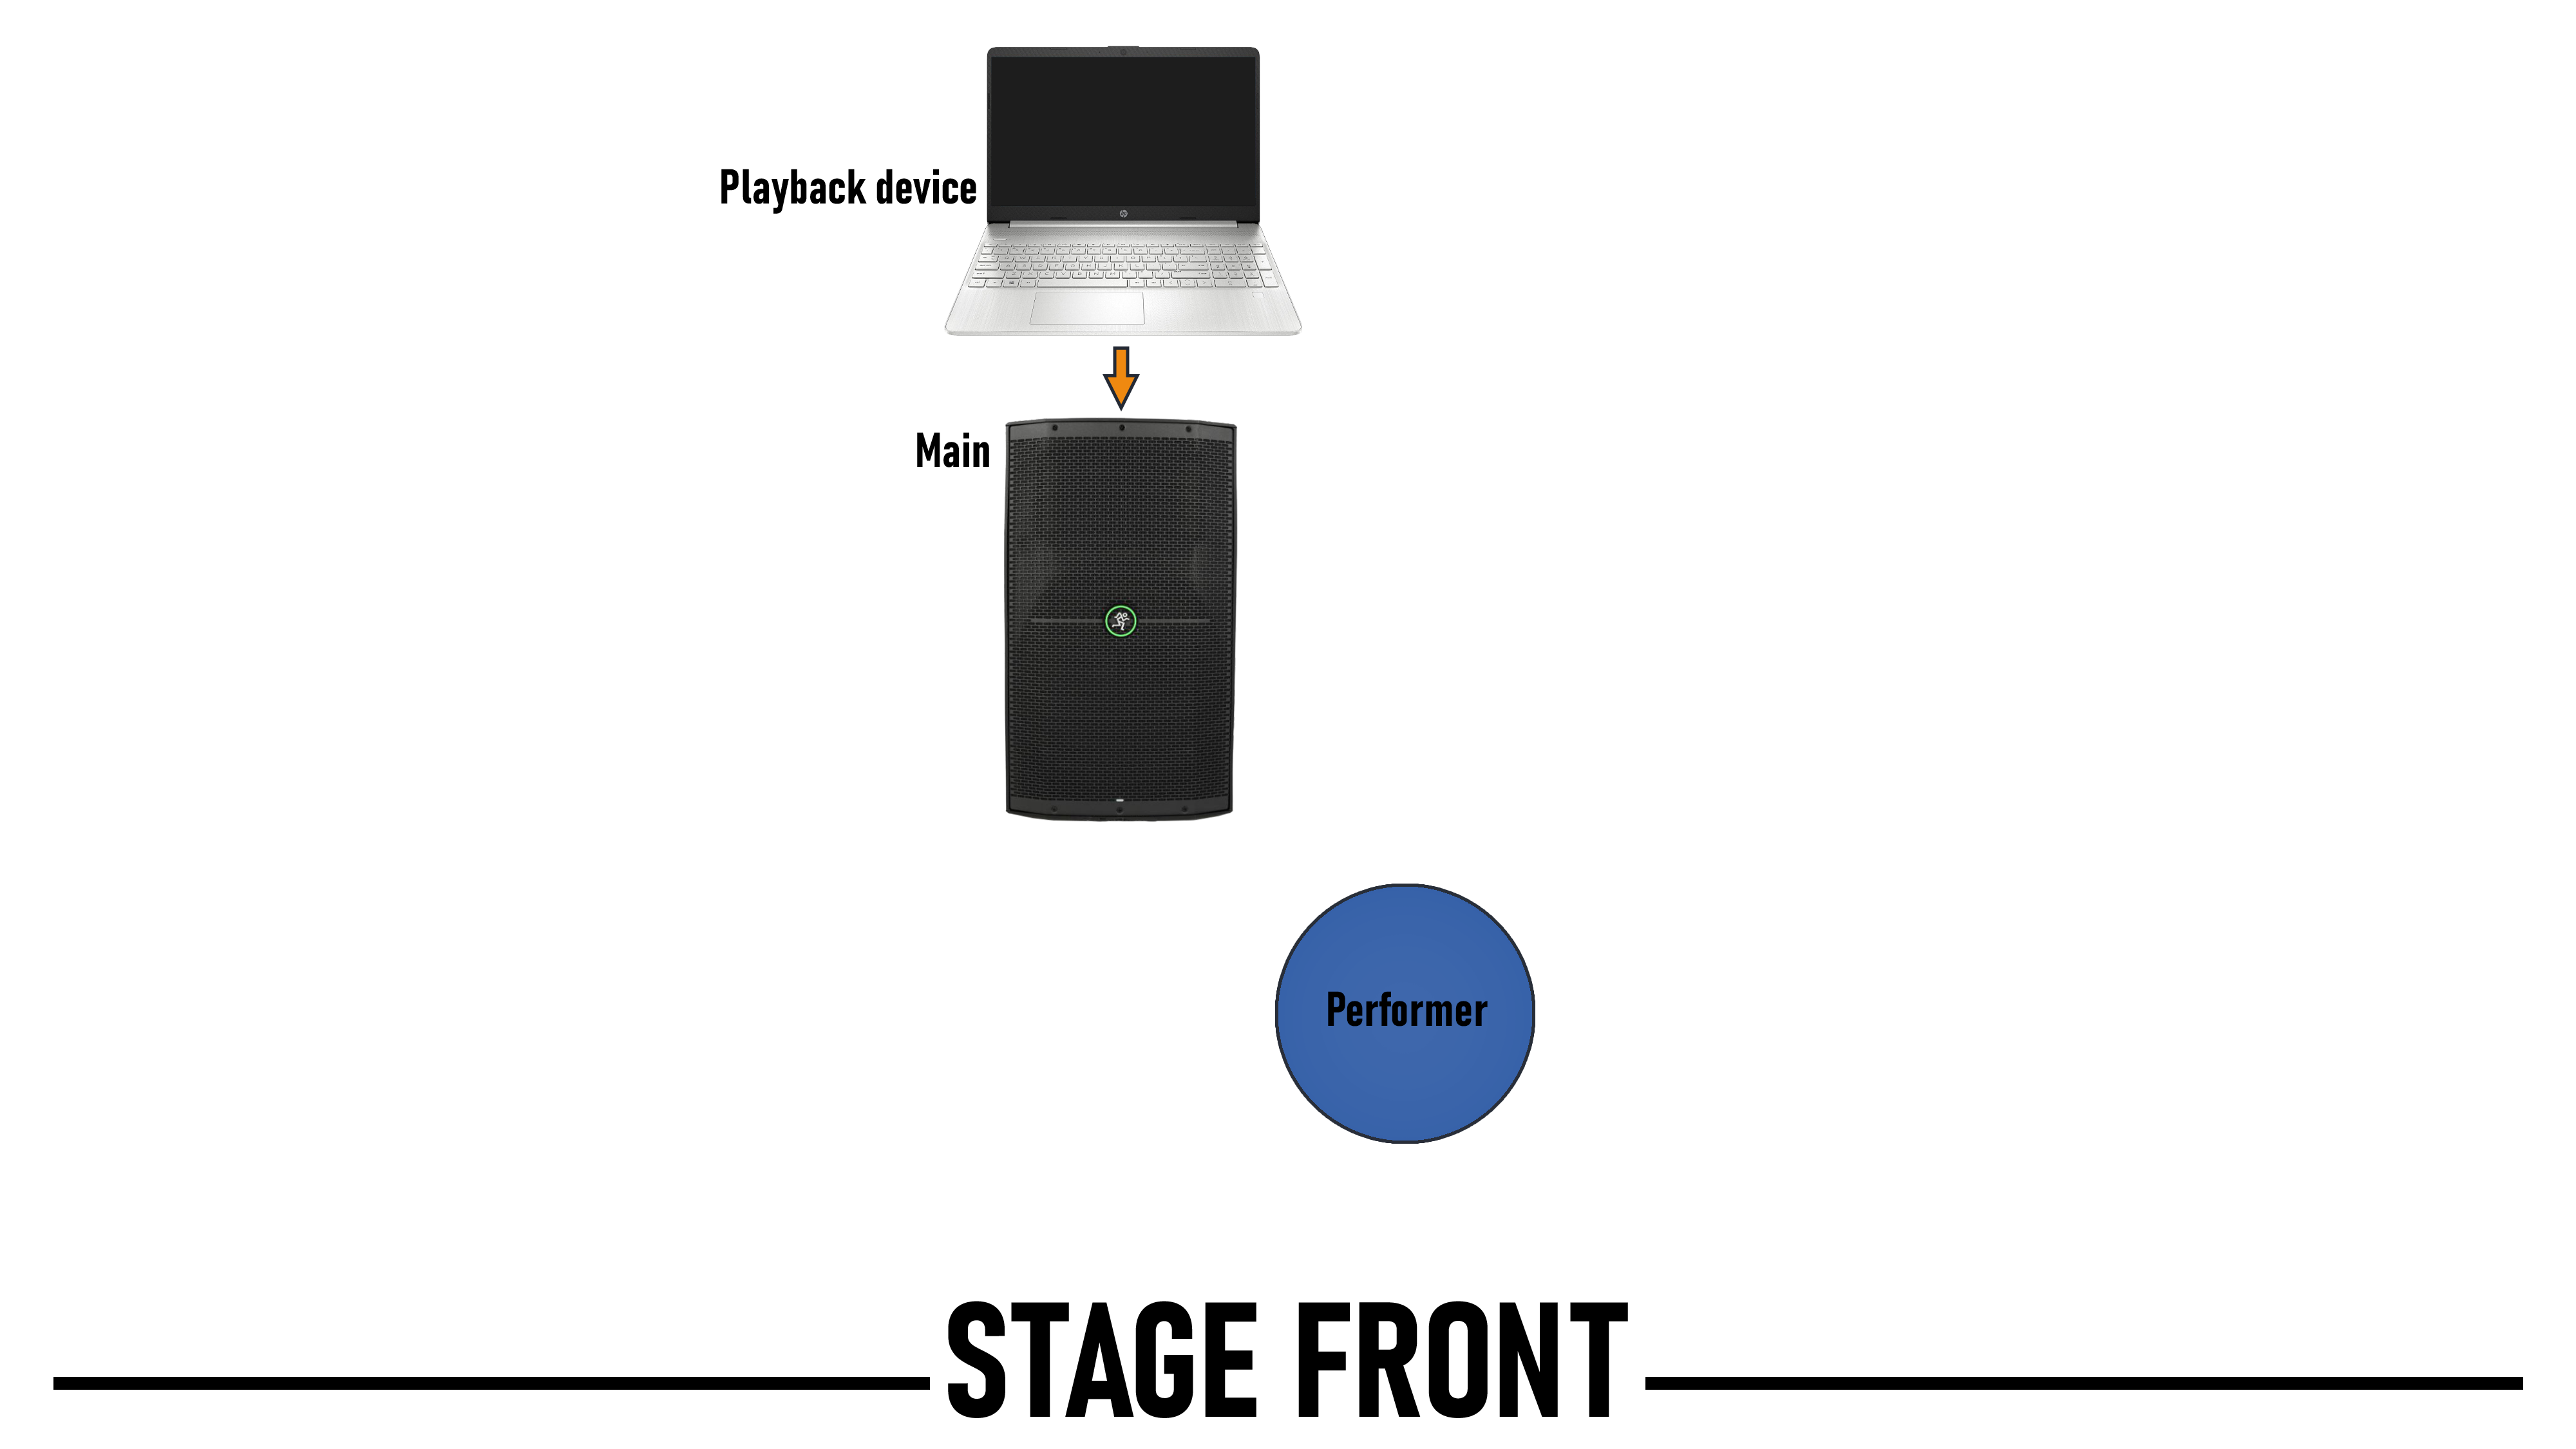
A single speaker setup is the simplest to stage. If you are using a monitor, simply set it up in front of you and pointed back at you while you and your main are both roughly center stage. During sound check, make sure your playback device is set to full volume. Adjust the volume on the main to where it’s balanced with your playing as heard from the audience, and then adjust the volume on the monitor to where you can comfortably hear it over your own playing.
A single speaker setup is also the easiest one to get away with not using a monitor. Both you and the main will still be center stage, but now you will perform downstage from the main, in front of it but still slightly off to the side, so that you can clearly hear it without blocking any of the sound. As before, set your playback device to full volume and set your main to where it’s balanced with your playing as heard from the audience. Note that since you’re now in front of your main, and much closer to it than your audience is, you may perceive it to be far louder than you’re used to. Resist the temptation to play louder to compensate.
Back to Top
Stage Setup: Playback Device, Two Speakers, and Monitor
Using the passthrough output, you can daisy chain as many speakers as you like. As mentioned before, however, this is still a mono setup; the same sound will be coming out of all your speakers.
Given the size of most venues, it’s likely that your mains will have to be placed too far apart for you to adequately hear them and stay in time with the recording, so for all two speaker setups a monitor is a necessity. For more information on speaker placement in two speaker setups, see section 4.
The soundcheck procedure for this setup is the same as it was for a single speaker with monitor, except that now you will have to make the same adjustments to both your mains, keeping them at the same level each time, or else one side will end up louder then the other.
Back to Top
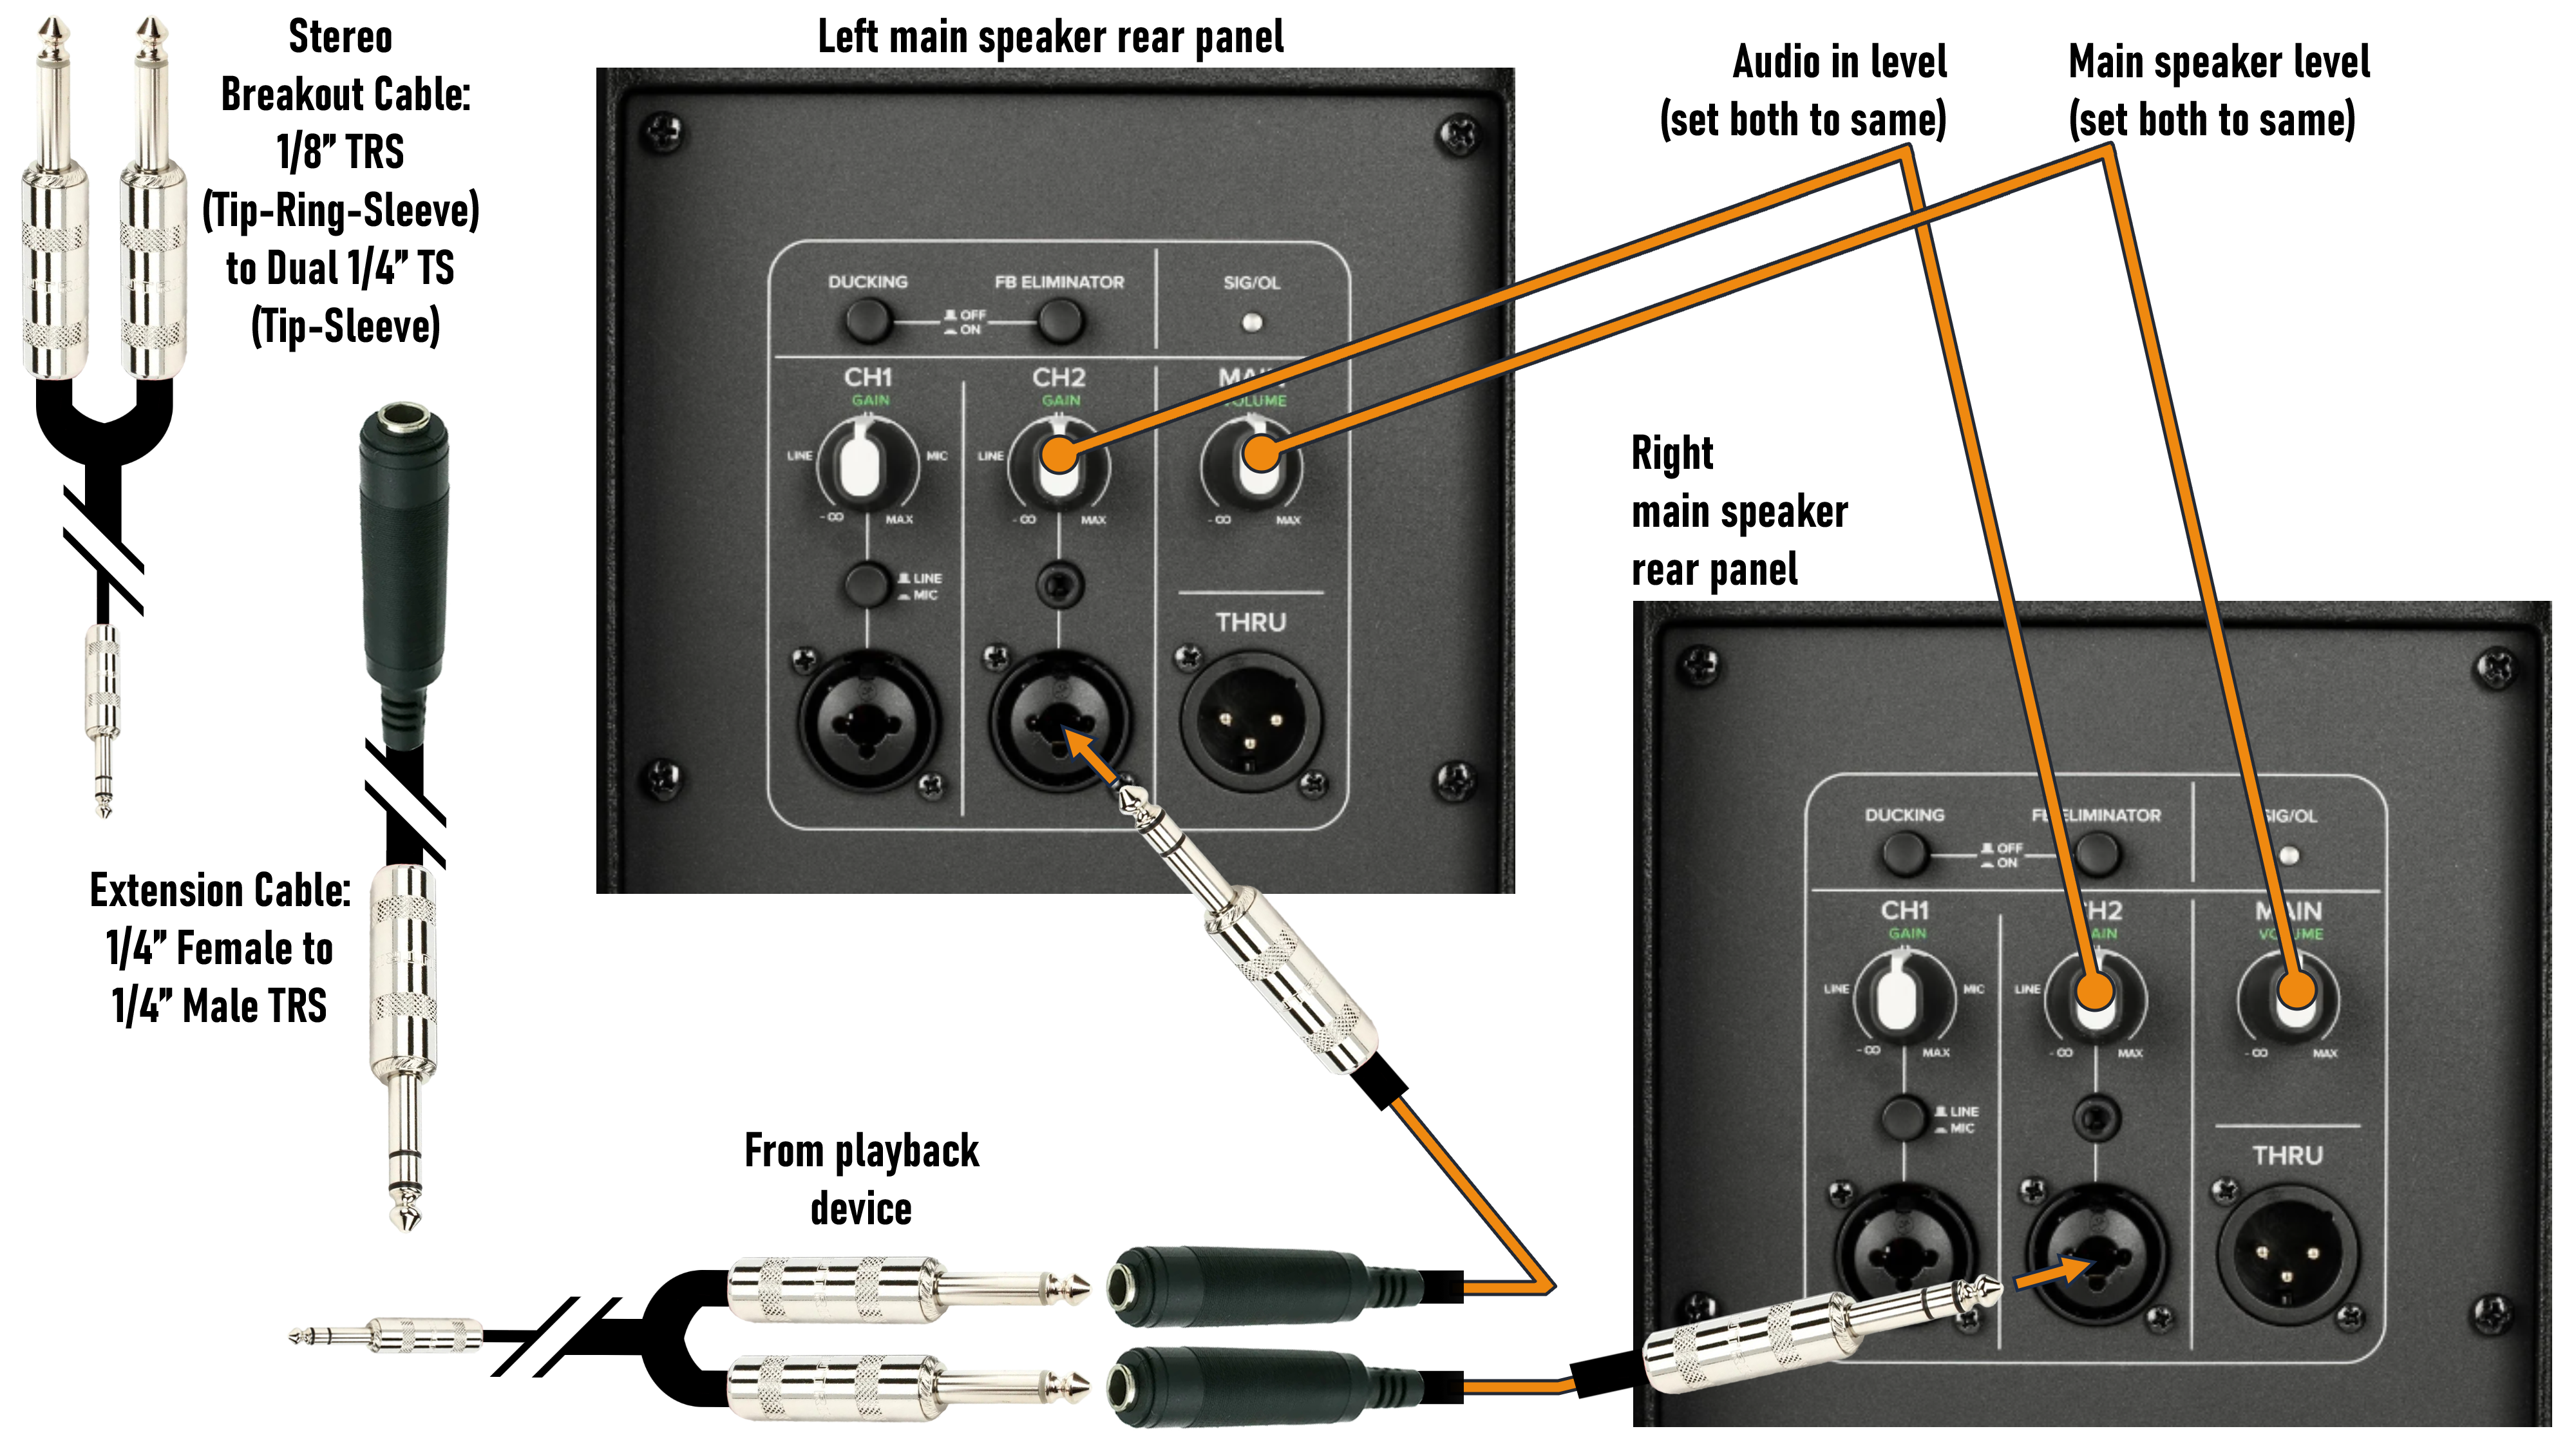
Playback Device to Two Speakers
For a true stereo setup, you can again use a stereo breakout cable, and simply add two extension cables with enough length to reach each of your mains.
You can also easily add a monitor the same way we have in previous setups, using an XLR cable and connecting your monitor to one of your mains using the main’s passthrough output. In this case, though, since each main is playing a different channel (left or right), whichever main you connect your monitor to is the channel you’ll hear through the monitor, meaning you’ll only be hearing either the left half or right half of your accompaniment track. This should still be enough for you to key into and keep time with the accompaniment, but if it isn’t, you may need to set up slightly further downstage than your mains, so that you can hear enough of the complete accompaniment to perform with it.
Back to Top
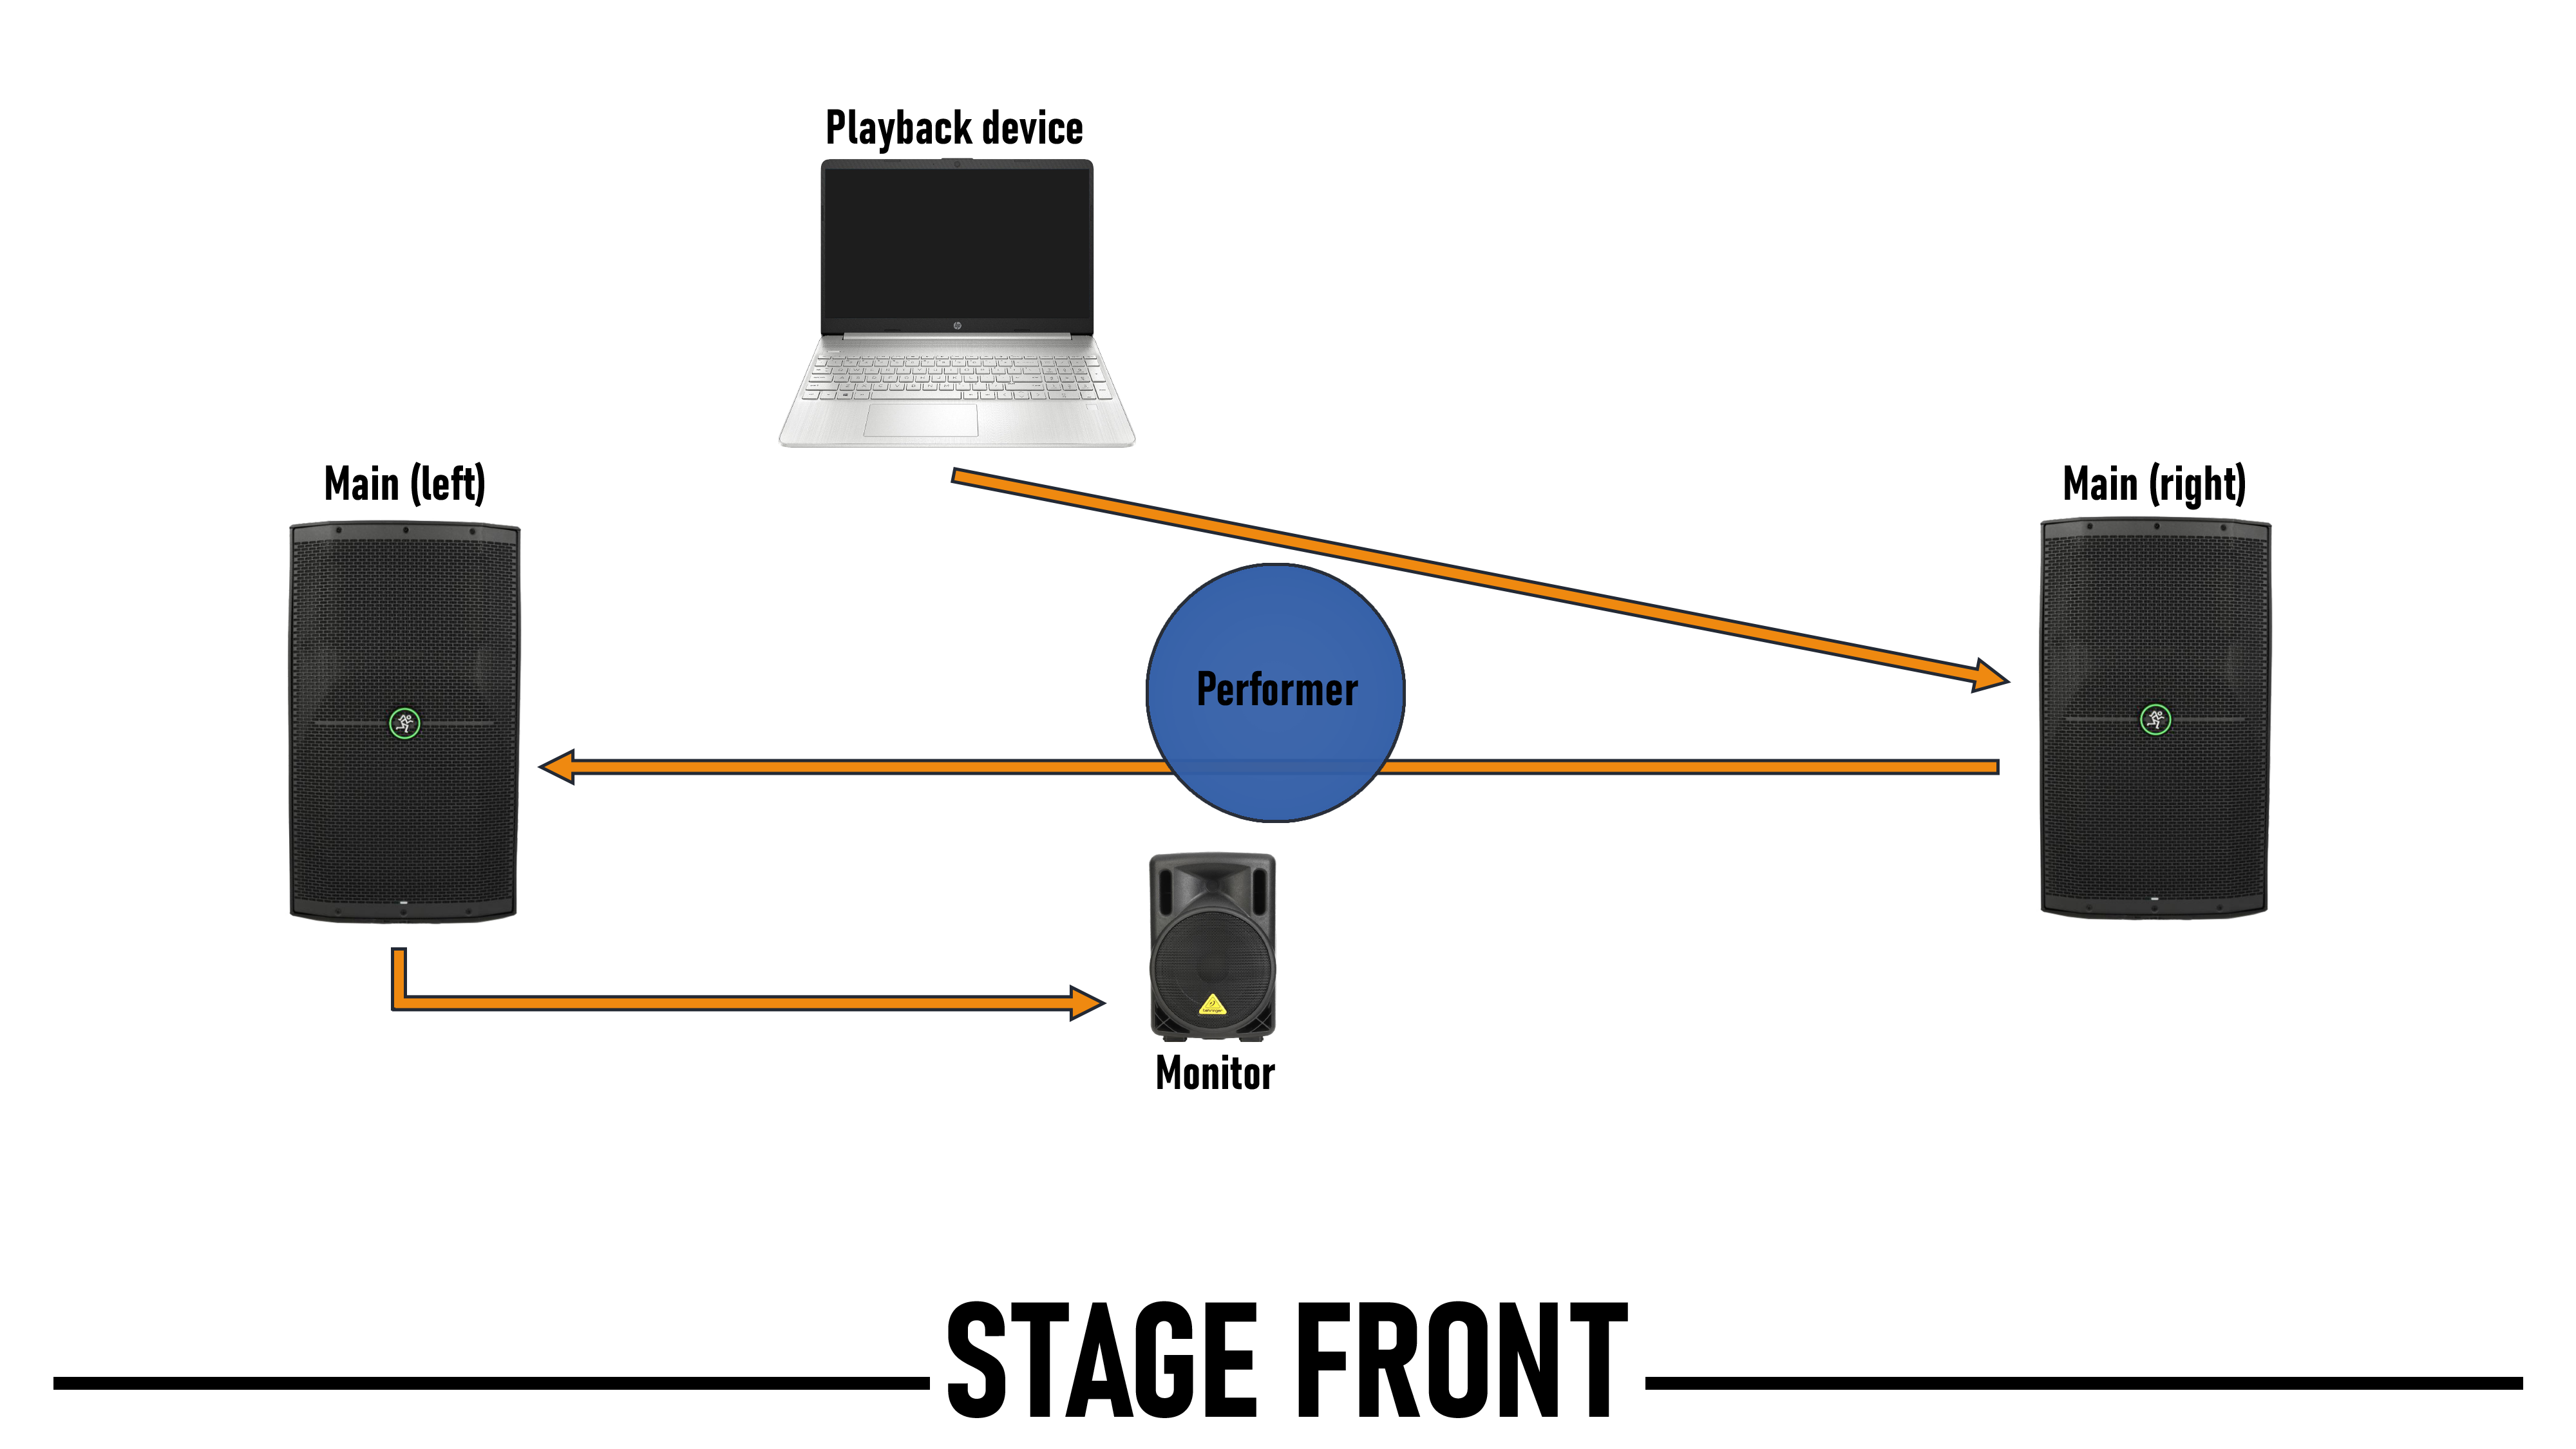
Stage Setup: Playback Device, Two Speakers, and Monitor
This staging is the same as it was for the mono two speaker setup, except now your playback device is running in to both your left and right mains, giving you true stereo sound.
Your sound check will be largely the same as it has been in previous setups. Set your playback device to full volume, make identical adjustments to both your left and right mains until the accompaniment is balanced to your playing as heard from the audience, and then adjust your monitor until you can clearly hear it while playing.
Back to Top
Playback Device to Mixer
If your mixer has a 1/8” auxiliary input, all you need to do is run a standard aux cord from your phone or laptop’s headphone jack into the mixer. If not, you'll need to use a stereo breakout cable. Note that you’ll need to run the two ends of your breakout cable into one of your mixer’s paired stereo channels (such as 3/4 and 5/6 above). If you’ve got a smaller mixer that only has mono line in channels (like channels 1 and 2 above), you can use one channel for each end of the cable; you’ll just need to make sure you set both channels to the same level, otherwise one speaker will end up louder than the other. Then, you’ll run a 1/4” cable out to both of your mains, and a third 1/4” cable to your monitor. Also, if your mixer has any sort of built-in effects, like delay or reverb, you'll want to make sure those are turned off or all the way down. You'll want to set your audio in channel's level and the main speaker level at a combination that produces the desired volume while also minimizing any humming or hissing from the speakers.
As for the 1/4” cables, there are two kinds we’ll be working with: TS, or tip-sleeve cables, and TRS, or tip-ring-sleeve cables. With a few exceptions like effects pedals, you’ll generally want to use TRS cables to connect everything. When hooked up to a mono output, as shown above, a TRS cable is carrying what’s known as “balanced audio.”
Inside a TRS cable are three wires: two conductors (hot/positive and cold/negative) and a ground. The conductors are connected to the tip (hot) and ring (cold), and the sleeve is used as the ground. Running from a mono output, the hot and cold carry copies of the same audio signal, but the polarity of the cold signal is inverted; the waveform is the same, but the wave rises and falls by the exact opposite amount from the hot signal. When the signal arrives at the input, this negative polarity is flipped, putting both signals back in phase. This also has the effect of cancelling out noise from any interference the signal picked up along the way. Any electrical or radio interference will impact both the hot and cold signals the same, but when the cold signal is flipped upon reaching the input, the noise on that signal is flipped as well, leaving the original audio in phase but the noise out of phase, and so the noise cancels itself out.
TS cables have only a single hot conductor and a ground, and so tend to be noisier over long distances. For this reason, whenever possible, use TRS cables.
Back to Top
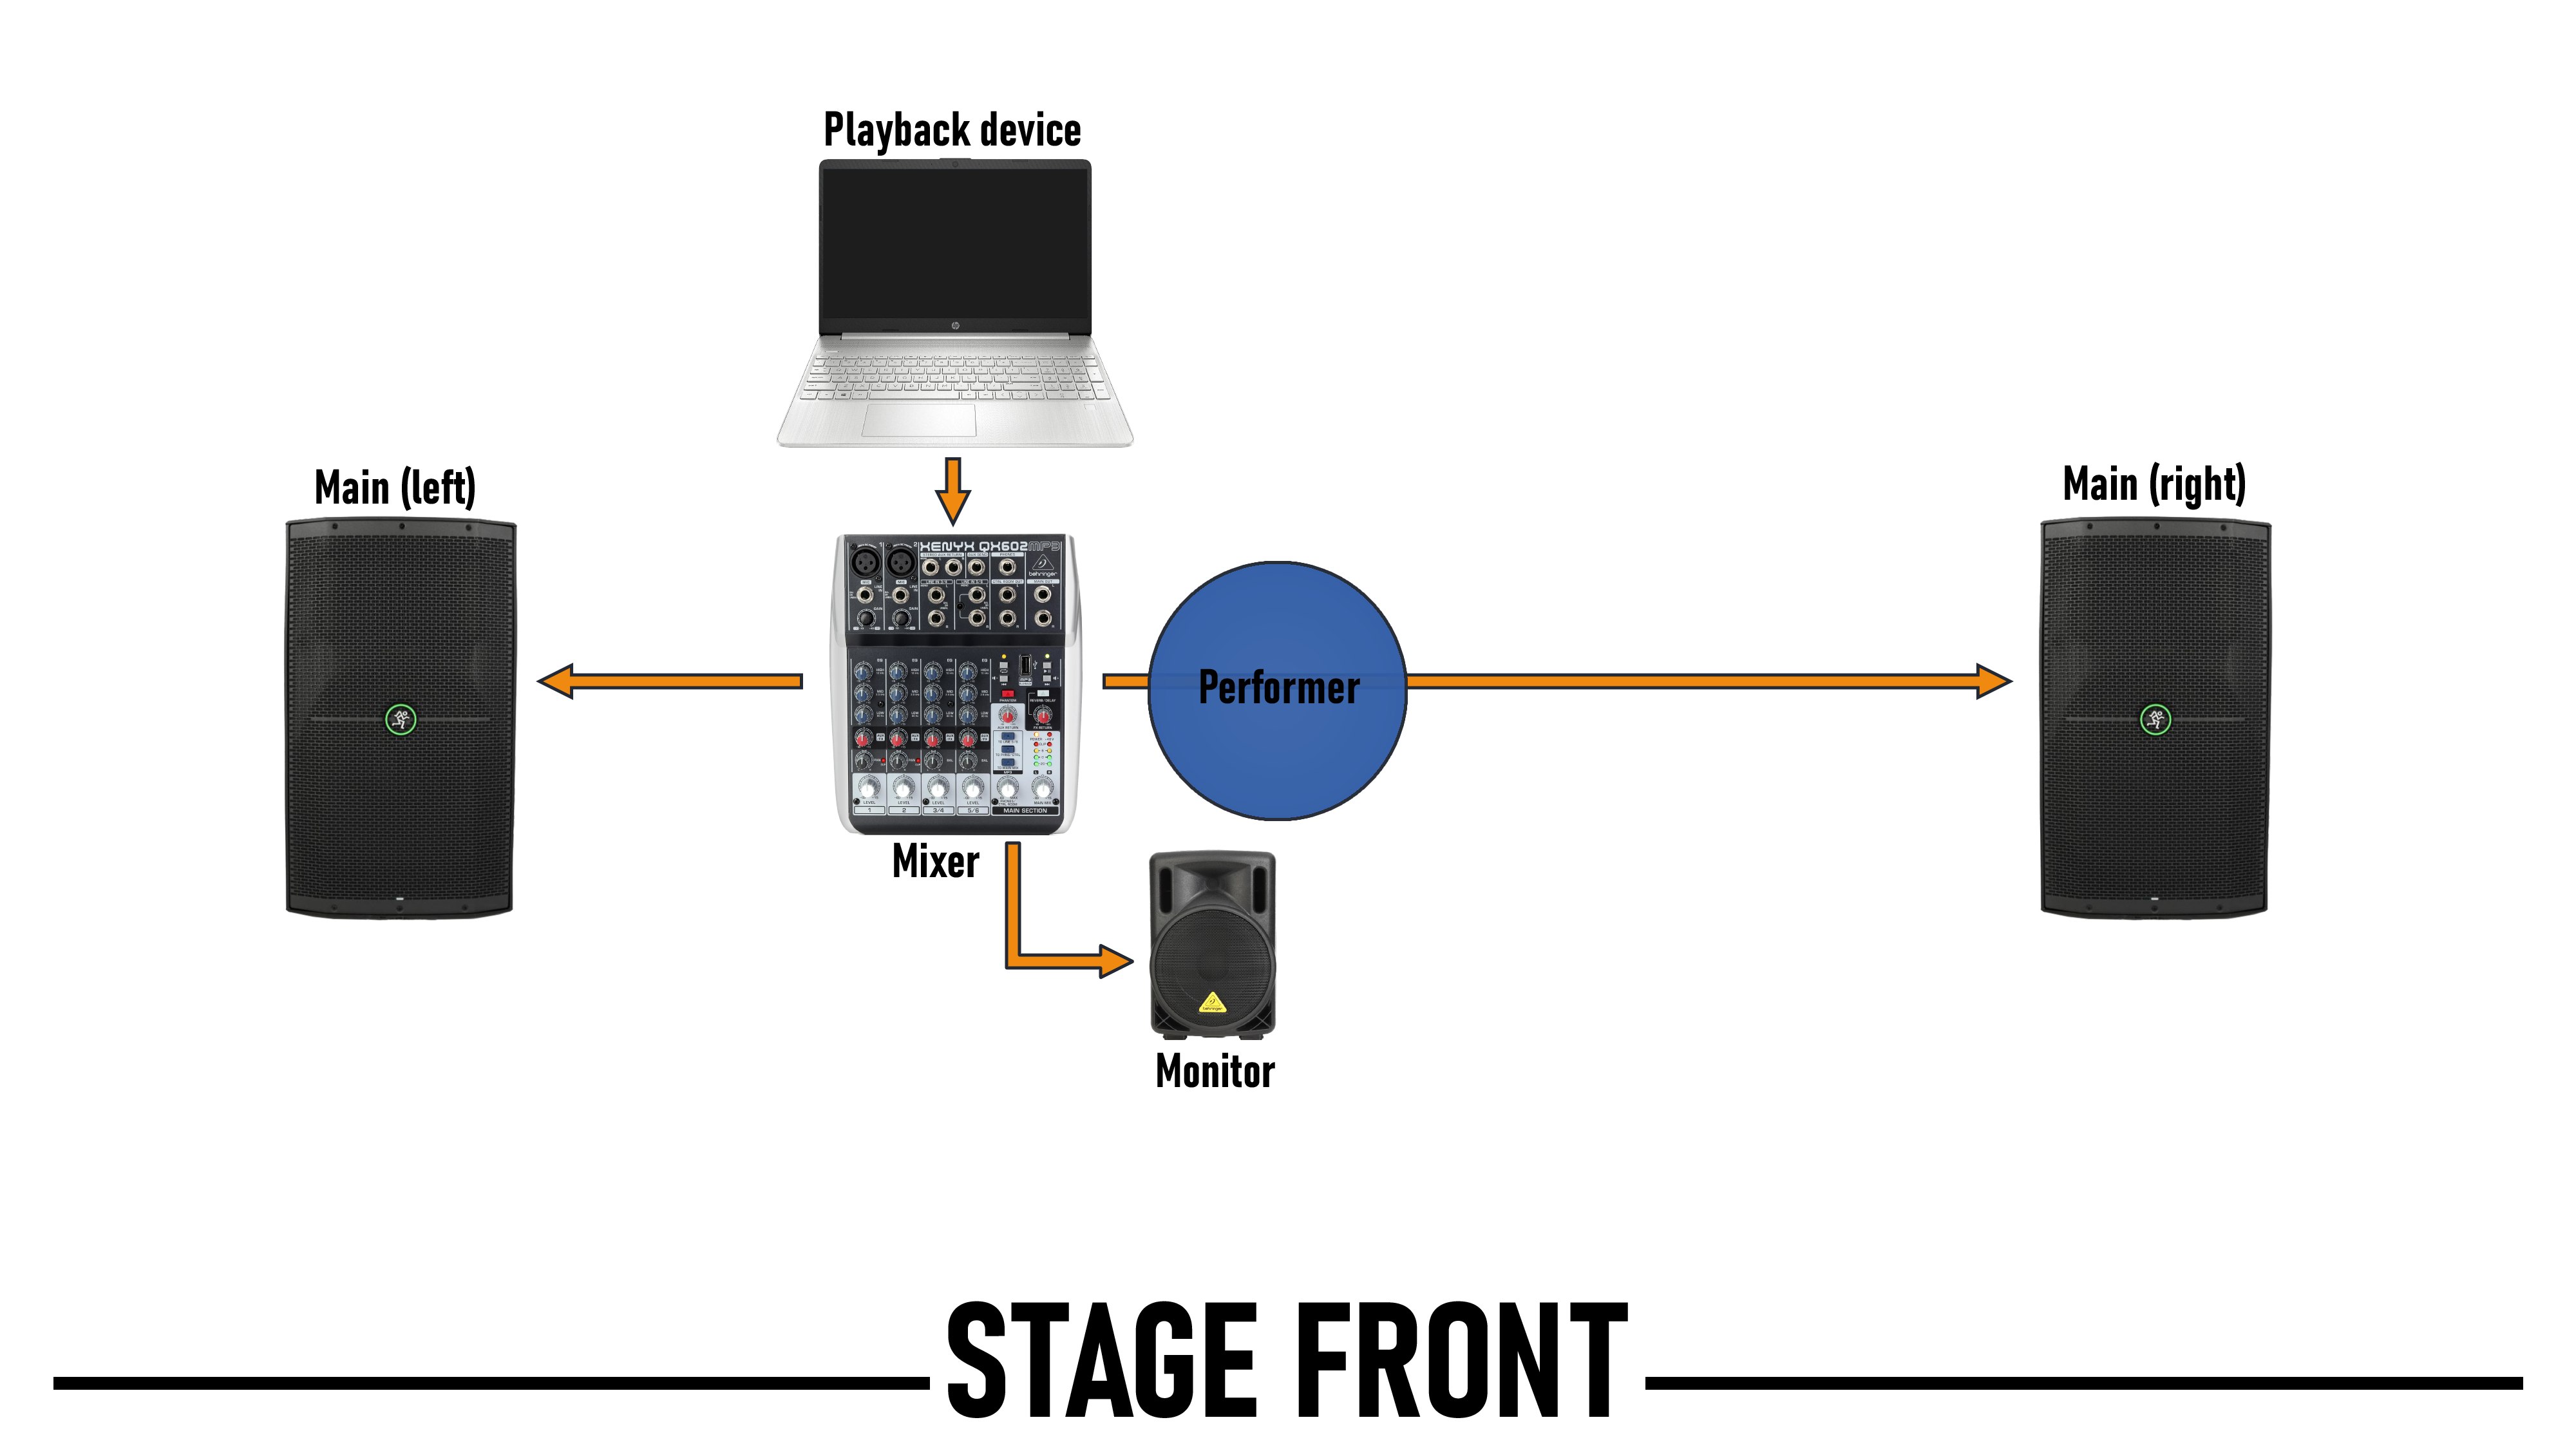
Stage Setup: Playback Device, Mixer, Monitor, and Mains
With a mixer, you now have the advantage of being able to control all your speaker levels from one device. While your mixer doesn’t need to be on stage with you, having it there allows for the most compact setup with the shortest (and therefore least expensive) cables, and allows you to control everything yourself without needing a second person to run your sound. There are advantages, however, to having your mixer offstage or even in the audience. During sound check, you’ll need someone listening from the audience to be able to make sure your electronics are balanced with your playing; it’s quicker for them to make the adjustments themselves based on what they’re hearing, rather than you making the changes from stage until they’re satisfied. Also, someone running your mixer from the audience will be able to make adjustments during your performance or troubleshoot on the fly if necessary.
As for the sound check itself, it’s the same as in previous setups; balance the electronic playback with your own playing, and then set the monitor to where you can clearly hear it.
Back to Top
Live Electronics - Laptop
Back to Top
Live Electronics - Effects Pedals
Back to Top
Speaker Placement
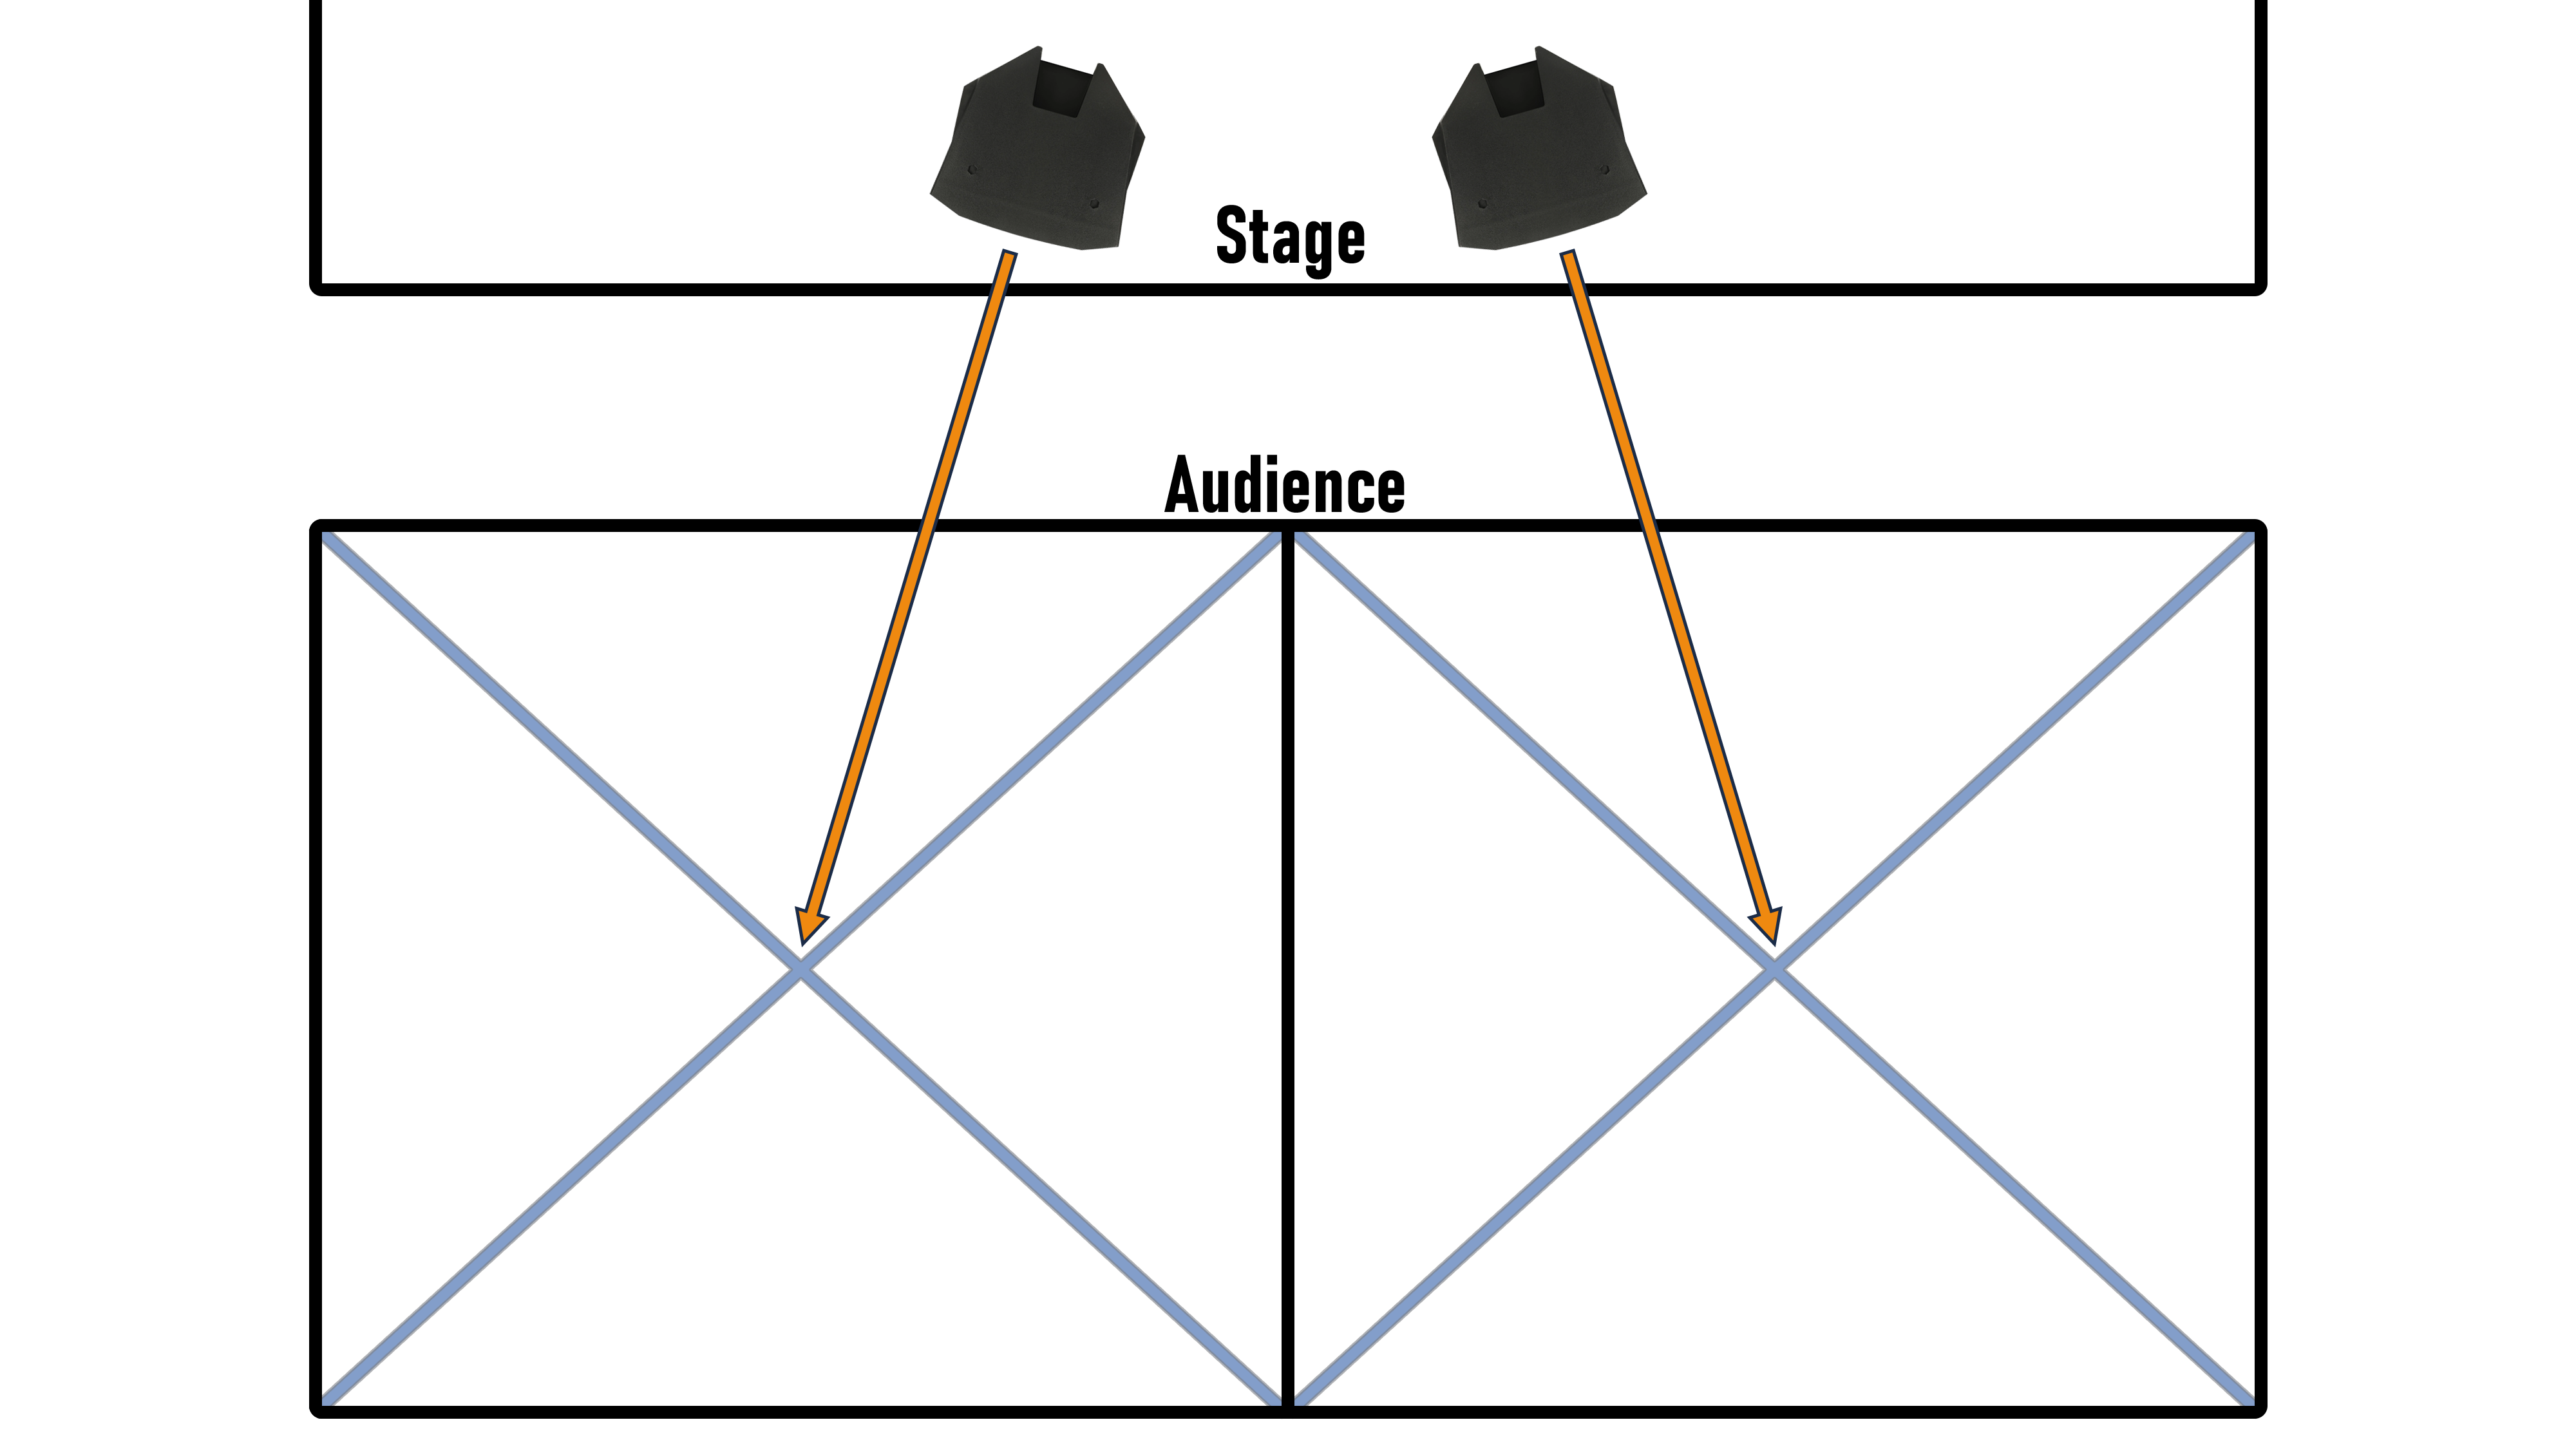
The angle of your mains and the distance between them will be dictated by the size of your audience. Briefly, you’ll start by dividing the audience in half. Set up a speaker centered on each half, pointing straight down that half’s center line.
If you’re unable to place your mains centered on each half, place them symmetrically and angle them so that each speaker is pointed at the center point of their respective halves. If your speakers are placed on the far side of each half’s center line (further from you), they’ll be angled inward.
If your speakers are placed on the near side of each half’s center line (closer to you), they’ll be angled outward.
Back to Top
Phase Cancellation, or "Why Can't I Just Use an Adapter?"
Back to Top